Saturday, July 9, 2011

Glass Etching

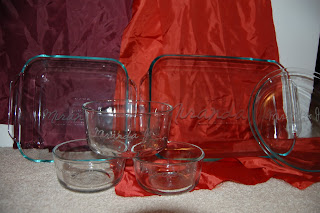
Finished Project:

Glass etching has been an amazing experience to learn how and begin doing. It is much easier than i ever would have guessed. Glass etching is completely permanent because it is scarring the glass where the etching creme has been placed and has eaten away at the surface of the glass.

I have found SO MANY things to etch! It has been an AMAZING project to do on my own pyrex mixing bowls, baking pans and glass pyrex storage containers-would especially help for anyone loaning out their dishes or living with roomates!

I have also found this to be a WONDERFUL gift as all my friends turn 21! Local dollar stores have so many plain glasses that it is hard to choose just one-and for only a dollar you dont have to choose just one. Give customized wine glasses, beer cups, beer mugs, shot glasses, martini glasses and more! Or stray away from the "drinking theme" and find drinking glasses or other glass serving ware. Gift recipients are always impressed and thinking you spent a fortune getting it personalized for them!


HOW TO GLASS ETCH
1. Find a glass object you wish you etch
2. Cut out a template and pattern/words for your project
   -When i first began glass etching i would print out the word i desired to cut on my printer (on normal paper with ink). Then i would tape this piece of paper to my contact paper, then spend (hours) lots of time cutting out the words with a contact knife..it gets the job done and these projects still turned out beautiful!
   -As my etching has continued I received a cricut as a gift and downloaded the sure cuts a lot2 software it has been such a blessing and has sped up the time to cut the contact paper by A TON!
  *No matter which method you use make sure the image is the correct orientation!
3. Clean the surface of the glass
4. Stick the contact paper with stencil of project onto the glass, make sure it is in place and all air bubbles are out because anywhere the etching creme gets WILL BE PERMANENT! You do not want the etching creme to get ANYWHERE besides the area that you want to etch.
5. Apply the etching creme on with a thick coat-so that you cannot see through the glass anywhere.
6. Leave it on for 10 minutes. 
7. At the end of 10 minutes you may scrape the remainder back into your container to use later if you wish. Then rinse off your glass object and remove the contact paper-it is suggested to use gloves to not come in contact with the etching creme!
8. Dry off your glass object and admire :)

Sunday, April 24, 2011

Sunburst clock mirror

Finished Project:
 I LOVE this sunburst clock mirror! The one that first caught my eyes was at target (here) and was only (ONLY?!) $84. I was so happy when i stumbled upon a blog to something similar which helped me create my own (Thanks Samantha)!

1. Supplies

-Clock (or mirror)-I found a clock at walmart for $3!
-Wooden craft sticks-at hobby lobby or michaels
-Paint-I used a shiny metallic silver spray paint
-Small circle mirrors-I got two different packages, one containing larger sized mirrors and one mixed pack with three different sized mirrors.
-Cardboard (to hot glue craft sticks on)
-Hot glue gun

2. Paint wooden craft sticks


3. Measure!
-I did 16 longer sticks (and marked those on the cardboard)
-Then cut 8 long sticks in half to make 16 shorter sticks, i placed these in between the long sticks and staggered them. 
-The circles in the middle showed me where to place certain sticks, the end of the longest sticks were at the circle furthest to the center, then the shorter sticks alternated between the two outside circles to give it a staggered look.


4. Lay it all out
  
5.Continue to lay it out, making sure each mirror is where it needs to be too.


6. Glue the craft sticks onto the piece of cardboard, then glue the mirrors onto craft sticks at pre-marked locations.


 This is what it looked like when it was all glued together, before the clock (or mirror) is added.


 7. Attach clock/mirror to center!
-The mirror that i got at walmart came screwed in to the box, this made it really easy to use those two screw holes to screw on my piece of cardboard that had the craftsticks/mirror bedazzle!

 8. Add some wire to hang and enjoy the burst of happiness in any room!


LOVE this mirror!

Cork Board Jewelry Organizer

Finished Project:
I previous stored my jewelry in a box, then on a regular cork board for a while. Then I stumbled upon this post, I loved the look and thought i would try something similar to hang my own jewelry!
1. Supplies
-Cork Boards: for this project I got a set of four 12x12 cork boards from Hobby Lobby (they were fairly inexpensive, especially with a 40% off coupon!). 
-Ribbon: any color!
-T-pins: normally found in the sewing section

2. Attach ribbon to cork
 If i were to redo this project i might put my cork boards in a frame or make sure i fasten the ribbon to them better (I had one fall and break once i filled it with jewelry it must have been too heavy!).

3. Put jewelry on cork boards! 
 Make sure you don't have too much on one side and none on the other so that it stays balanced! Enjoy the work of art!


Monday, January 10, 2011

Desk Organizami

Finished Project:

To make a box, start with a square (different size squares will just create different sized boxes). 

Fold the square corner-to-corner in both directions.

Then bring one of the corners to the center and fold along the edge.


Then fold that edge up to the center line as well.

Do the same to the opposite side so that it looks like this:

Then unfold and do the same process to the other two corners.

Then unfold it all again. When you open it up it should look like this. Cut along the lines as shown in the picture (you should be cutting in two squares and have a 2x2 cube box left in the center when finished cutting).

Then, fold edge back to center as shown.

Then fold up little arm pieces, as shown. Do this to the opposing side as well.

Little arms should come together and overlap, as shown in picture.
Then use the remaining piece to fold over the "arm" pieces.

Do this to both sides.

Put a piece of tape in the bottom and viola! You have a box for organizing! Make as many as you see fit!


Web Counter
Web Counter

Exploding Box

Finished Project:


Start with 4 pieces of card-stock (or other heavy & durable paper) that are at least 10''x10'' for the box portion of the project. Additionally, you will also need 1 piece for the lid.


Cut the first piece of paper to a 9 3/8''x 9 3/8'' square.
Cut the to 9''x 9'' square.
Cut the third to 8 5/8'' x 8 5/8'' square.
Cut the fourth to 8 1/4'' x 8 1/4'' square. 


Then you need to draw lines across the paper to split it equally into thirds each way (horizontally and vertically). 
The first piece will be at 3 1/8'' intervals.
The second piece will be at 3'' intervals.
The third piece will be at 2 7/8'' intervals.
The fourth piece will be at 2 3/4'' intervals.

Then, following the lines cut out the four corner pieces on each piece of paper. Then fold along the remaining lines.

Stack the pieces beginning with the largest to smallest to create the exploding box effect. 
Decorate as desired!


For the inside my box i made each inside flap a month of the last year. On the front i put a picture from that month, on the back I typed a little summary of fun things we did that month along with using something (ticket stubs, map pieces, various papers from travels) on the back of the corresponding flap. It made a great anniversary present that summarized our first year in a fun way!


To make the lid:


Cut a 6 5/8'' x 6 5/8'' square. 
Draw a line 1 5/8'' away from all edges, then fold along this line.


Pinch and tuck in the corners, use tape to hold them down. 
Decorate the top as desired!


For my lid i used the school map with a red X marking the spot of the classroom we met. Decorated the outside of the box and when i gave it to him he was definitely surprised (and stunned happily!) at the contents inside!


Additional sources/ideas:


Free Hit Counter
Free Hit Counter

Monday, January 3, 2011

Jewelry Mirror

Finished Project

 I got the inspiration do to this project from a friend who had a mirror like this in her room, it looked so fun and full of bedazzle I just wanted to try it out!

First: my sister and i went through all of our old/broken/unused jewelry that we no longer wear (goodwill or other cheap hand-me-down stores are great places to start for great old gaudy stuff!). Key: finding items large enough to cover the frame!


Next: I got mirrors that were a pretty nice size from target for only about $5 that had a nice thick frame on them that could be used to attach lots of our findings!


Then: we laid out all the bangle we wanted to use and used a hot glue gun to attach it to the outside of the mirror. 

That's really all there is to it, get creative..you could use anything really, doesn't have to be jewelry (I just liked it, thought it looked like a bedazzled princess mirror!). Get creative and enjoy!


Free Counters
Free Counters